THE SUCKING STICK APP - Sucking Stick™
Slim, fast, safe: The Sucking Stick™ App
The Sucking Stick™ automatically searches, sucks and backs up the desired files to the fast USB 3.X memory
USB sticks are fascinating. It is unbelievable how much data fits on such tiny chips! For comparison: My first PC hard disk for retrofitting weighed about two kilos, held 270 MB and cost 780 DM (about 390 Euro). I was thrilled! However, that was about 40 years ago now. A USB stick with the hundredfold storage capacity does not cost 20 € today and can be easily carried away in the wallet.
Up to now, it has often been tedious...
If you want to save files on conventional USB sticks - for example, to protect them from loss or destruction or to copy them to another system or a smartphone ("On-The-Go" sticks) - you first have to laboriously and time-consuming search for them in the almost unfathomable depths of the file system on your PC, smartphone or tablet. Over time, countless photos, videos, music or audio books, e-books and of course typical office documents such as letters, spreadsheets, presentations and notes accumulate on the systems. They can be found in download directories, own directory trees, smartphone backups, data directories of various application programs or self created project folders on the built-in and externally connected drives. Hardly anyone - especially "hunter-gatherers" like me - keeps track of them here. And after each backup, the unpleasant feeling remains that something important might not have been found and therefore not backed up.
The Sucking Stick™ brings comfort and speed to data backup
The Sucking Stick™ puts an end to this situation once and for all. The Sucking Stick™ already comes with an absolutely easy to use and incredibly fast program for automated search and file transfer from PC, smartphone or tablet.
Your advantages:
- You save many hours of timeInstead of spending hours searching your entire system for the content you want, let the intelligent Sucking Stick™ app do the work for you. If you wish, it can back up an entire device (PC, smartphone or tablet) with just one click.
- You no longer overlook anythingThe Sucking Stick™ automatically ensures that all the files you are looking for are found - no matter where they are hidden. Of course, the Sucking Stick™ can also be used successively with different PCs, smartphones and tablets. By the way, the predefined list of file types in the different categories (pictures, videos, ...) can be easily changed/supplemented according to your wishes.
- You save everything important in no time and save spaceYou define whether the backup of all searched files of a certain type on the stick should be made into a single directory/folder (for example with the name "Pictures", "Videos" or "Audios"). In this mode, each file with the same name and the same size only ends up on the stick once. Different file versions with the same name but different size are automatically renamed. Experience has shown that this procedure saves a lot of backup memory because of the frequently encountered duplicates.If desired, the program can also completely recreate the directory structure of your device on the stick. In this case, however, all file duplicates are stored in different directories on the stick.
- You get all changes automatically with each runDuring renewed search/backup runs, the Sucking Stick™ program only sucks up changed/added files to your stick. So you can keep your backup up to date with just a few clicks.
- You save a lot of moneyBackup software usually costs a lot of money, has to be installed and constantly maintained. Your Sucking Stick™ already has everything you need for highly convenient backups. You do not need to install anything. The costs for the program are already included in the price of the Sucking Sticks™.
- At the moment, the Sucking Stick™ is available in German and English ("The Sucking Stick™"). Other languages can be added within a few days if desired.Available in German and English
- Open for your wishes and ideasIf you have your own ideas about which additional functions your Saugstick™ app should have, please contact us. We will implement them as soon as possible.
It's so easy to use the Sucking Stick:
- Plug it in!Plug your Sucking Stick™ into a USB port of your Windows PC (Windows Vista or later). The best results are achieved by using a USB 3.X port (often recognisable by the blue colour of the inner plastic part), because this interface allows a much faster data exchange than a conventional USB 2 port.
- Start the App!Start the application (SS.exe) on your Sucking Stick™ and confirm the terms of use. The Sucking Stick™ does not require any other program on your Windows PC, Smartphone or Tablet. It comes with everything you need and is ready to use without installation.
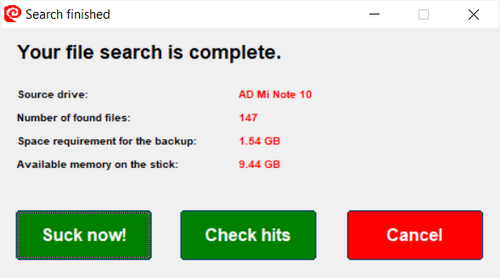
- Search! In the Sucking Stick™ App specify which media types (for example, photos, videos, music, office documents) you want and on which drives/devices you want to search. You can also limit the search results by file size or time range if you only want certain files. Or you can directly specify a character string for the file names you are looking for.When the search is complete, the program shows the number and size of the files found as well as the free space still available on the stick. You can comfortably view the hit list and the found files. You may show, delete or save some files or exclude them from the backup.
- Suck!Suck/back up all the files you want with one click on your stick. During the backup, the Sucking Stick(TM) app shows you the current file with its size and the backup directory on the stick. The other displays inform you about the progress of the backup, which can also be paused or cancelled completely at any time.
One-Click Backup
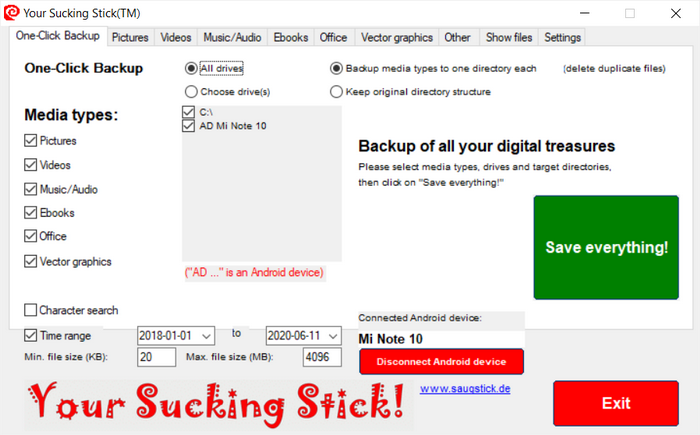
Immediately after starting the Sucking Stick™ app and accepting the user agreement, you have the possibility to make an overall backup with a single mouse click in the start window of the program. In the default settings all media types and all drives are already selected. A click on "Save all" starts the process.
Limiting your search/backup
If the overall backup is too extensive for you, deselect the unwanted media types, specify the drives/devices for this backup individually after clicking on "Select drives", specify the minimum and maximum file sizes you are looking for or determine the period from which the desired files should originate after clicking on "Time range". It is also possible to specify a character string for the desired file names.
By default, the program searches/sucks all file types of the selected media types. If you would like to reduce the variety of file types, select the corresponding media type (images, videos, music/audio, ...) via the tabs (at the top of the program window) to only tick the desired file types. Repeat this with the other media types if necessary. If you then return to the One-Click Backup tab and click "Save All!", only files that match your criteria will appear in the results list. This way you speed up the search/backup considerably and only get the files you want.
Search for specific media types
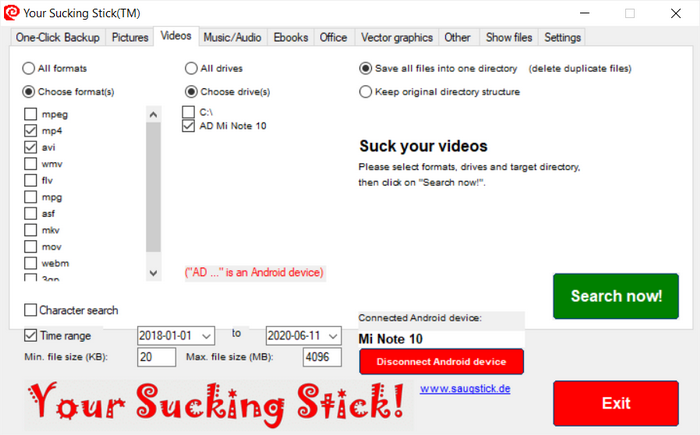
In addition to one-click backup, you can also search/backup individual media types such as pictures, videos, music/audios, e-books, office files, vector graphics or others. To do this, click on the desired media type in the upper tab bar. The corresponding tab opens. Here you have the possibility to select certain file formats if you do not want to search for all preset file formats. To do this, click on "Select formats" and tick the desired file formats. In the "Settings" tab, you can even customize the lists of file formats to suit your needs.
On chosen media tab, you can also select the individual drive/device, file size and time range restrictions and specify a search string. A click on "Search now" then starts the search for media of the desired type with the selected restrictions.
In the example above, you start the search for video files of the formats MP4 and AVI, which are at least 20 KB and at most 4 GB in size and originate from the time between January 1, 2018 and June 11, 2020, on the connected Android device Mi Note 10. In addition, you have specified in the upper right corner that you want to save all found videos to a common directory on the Sucking Stick.
Search for other files
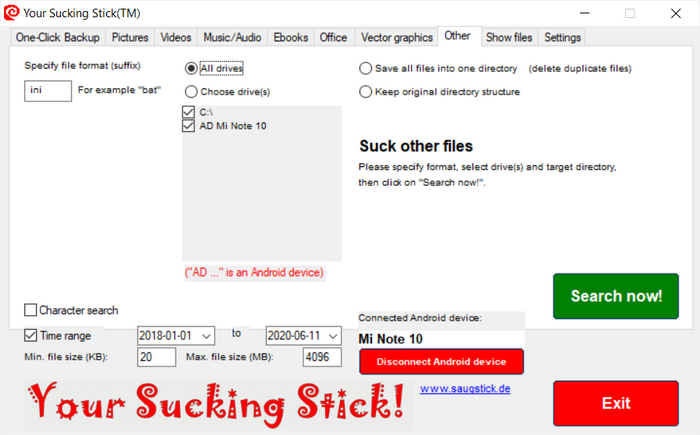
If your desired file format is not provided for a media type, you can directly enter the desired file format in the tab "Other" (only the file extension, without dot!), search for it and save the hits.
In addition, on the "Settings" tab, you can edit the list of file formats for each media type separately, i.e. delete preset file types or add additional formats.
Check the hit lists
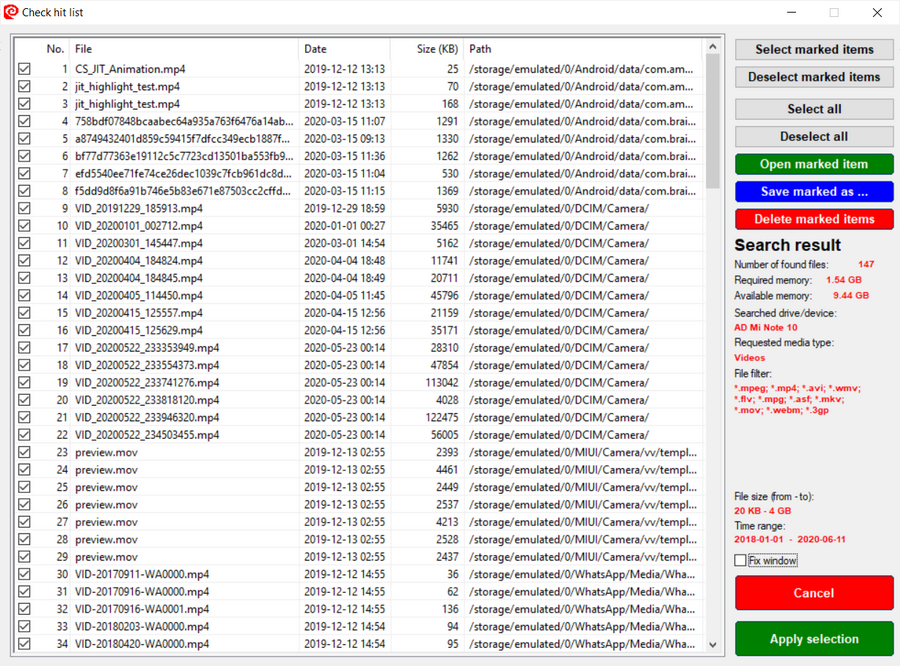
Once a search is complete, you have the option of checking the hit lists. To do so, click on the middle button of the search results window "Check hits":
This window is a powerful tool for your data management:
In the lower area of the right-hand info and button bar, the search information such as the drive/device searched, number of hits, storage space required for the backup or the search and filter criteria are displayed. At the top right are the gray buttons for quick selection or deselection of search hits (the selection status of each file is indicated by the boxes on the far left). By selecting or deselecting files, you determine whether they are included in the subsequent backup or excluded from the backup.
The large hit list can be sorted by clicking on the column headers (up or down). Double-click on the file name or click on "Open selected" to view the files found before the backup. Windows opens the program associated with this file type on your computer. To make sure that you have the full screen area available when viewing the files, the hit list slides to the right. When you move the mouse over the right edge of the window, the list window swings back to its original position. By clicking the "Fix window" checkbox, you can keep the hit list on the screen.
You mark files with the mouse and keyboard (including multiple selection with the Shift and Ctrl keys), as is usual in Windows. Marked files are displayed with a blue background in the list. With the red button "Delete marked files" you remove the marked files (permanently!) from the drive or Android device. And finally, click the "Save marked files ..." button to save your marked files in any directory of your computer.
A click on the lower right "Apply selection" button removes the unchecked files from the hit list and brings
you return to the search-finish dialog, from where you start the Sucking Stick backup by clicking the "Suck now!" button.
Connection of Android smartphones and tablets to the Sucking Stick app
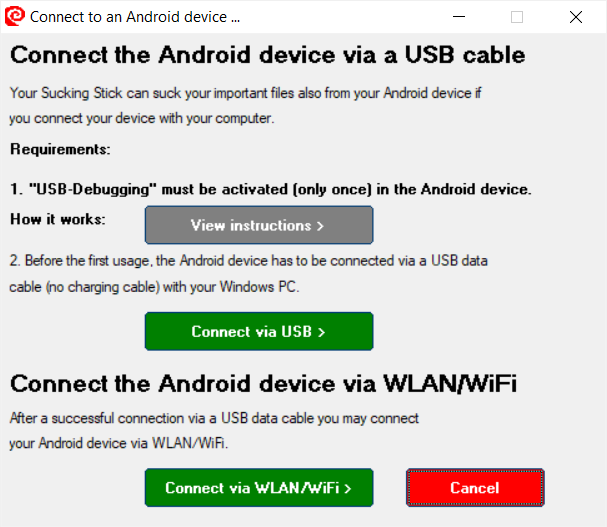
In all program tabs a click on the green button "Connect to Android device" opens the connection window:
Before connecting for the first time, the so-called "USB debugging" must be activated on your Android device only once. This is a developer interface provided by Google, through which the data exchange between PC and Android device takes place. USB debugging is not to be confused with "rooting" an Android device. By activating USB debugging, you will therefore not lose your warranty claims to the device manufacturer. A short video shows you how to activate USB debugging. Click on the button "View instructions >" to watch a short video. You can also find the video tutorial here.
Connection via USB cable
Connect your smartphone or tablet using the USB data cable. (Please note that a charging cable is not sufficient for this purpose, as often a charging cable does not provide all the necessary lines to the computer). After clicking the "Connect via USB >" button, the Sucking Stick app will connect to your connected device and then display the connected device with its name in the program window. The device also appears as an additional drive in the drive selection. For backups from the Android device, simply select it there.
If you connect to your Android device in the future before you start the Sucking Stick app, the Sucking Stick app will automatically recognize your device at startup and display it in the program window.
Connection via WLAN
The Sucking Stick app saves the IP address of your device after successful connection via USB cable. If your smartphone or tablet is in the same WLAN as your Windows PC, it is therefore possible to connect via WLAN later. To do this, remove the USB cable and click on the "Connect via WLAN" button. If a WLAN connection is not possible right away, follow the program's instructions. Because the device manufacturers sometimes use different security measures, the connection via WLAN cannot always be guaranteed.
The backup directories
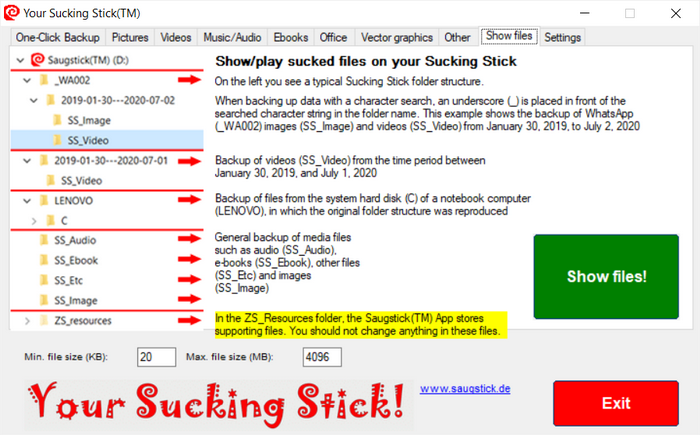
The Sucking Stick app saves the sucked files on the Sucking Stick in different directories, depending on the settings you made before the backups. On the program tab "Show files" you get access to the backed up Sucking Stick files with the Windows-Explorer. A double click on a specific file opens the program registered by default in Windows for this file type and displays the file in it. For example, a double click on a doc file will start Winword if it is installed on your computer.
1.) Backup to one directory
With the standard setting "Backup to one directory" all found files of a media type (i.e. all pictures, videos, audios etc.) are backed up on the Sucking Stick in the same directory. The directories are called SS_Image, SS_Video, SS_Audio, SS_Ebook, SS_Office, SS_Vector and SS_Etc. The directory names have been chosen so that you can immediately see that they have been created by the Sucking Stick app (SS_) and which media types (image, video, audio, ...) they contain.
This form of backup has the advantage that files with the same name, size and modification date are only backed up once, even if they were found in different locations (on the PC or the Android device). This saves a lot of storage space in case of frequent duplicates and facilitates the later viewing of all media. Files with the same name and the same size but different timestamps are also backed up by the Sucking Stick app, but the app adds a consecutive number to the backup file name for each newly found file. For example, the file name "index(2).html" means that there is already a backup file "index.html" with a different size and/or timestamp.
2.) Keep original directory structure
With this setting, the directory branch of the original device (PCs, smartphones or tablets) is reproduced on the Sucking Stick. The base directory then carries the name of the device, for example "Mi Note 10" on a Xiaomi Mi smartphone or "Lenovo" on a Lenovo PC. Below the base directory, the drive names follow, for example "c" (for the first hard disk on PCs) and the entire subdirectories with the media files stored in them.
This form of backup has the advantage that the media files can be restored to the original file structure on the PC or Android device if necessary. In addition, all files found are backed up (even file duplicates in different directories).
3.) Time range backups
To make it easier for you to find backups according to special time range specifications on the Sucking Stick afterwards, the Sucking Stick app saves such runs in a corresponding base directory. For example, in a directory named "2016-01-01---2016-12-31" you will find all backed up files from January 1st to December 31st, 2016. Below this base directory the Sucking Stick app stores the subdirectories according to the chosen scheme, i.e. "Backup to one directory" or "Keep original directory structure".
4.) Search for a character string in the file name
If you know which character string the searched files have in the file name, simply enter it into the input field that appears after clicking on "Character search". Then you will only find files in the hit list that have this character string in their name. For example, enter "WA" (without quotation marks) to save your pictures and videos from the WhatsApp chats from your smartphone.
5.) System directory ZS_resources
In addition to the backup directories, you will also find the hidden directory "ZS_recources" on the Sucking Stick, in which all texts, pictures, auxiliary programs etc. of the Sucking Stick app are stored. The contents of this directory are usually of no interest to users. Changes to these directories or their contents can lead to functional restrictions and loss of warranty.
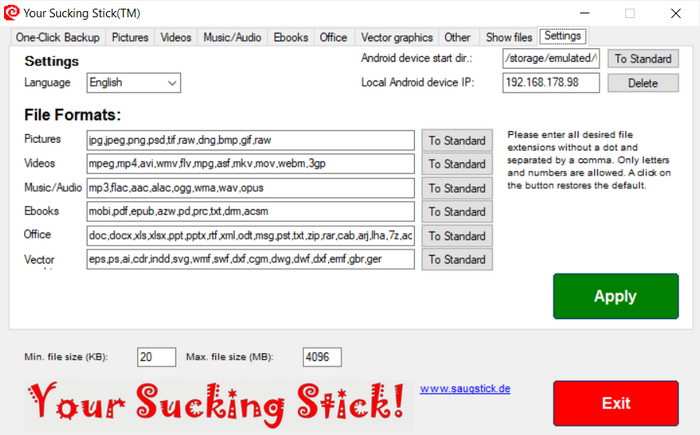
The settings
In the settings tab you select the language of your Sucking Stick app and edit the lists of file formats for the media types. A click on the "Back to Standard" button will reset changed contents to the default settings.
Experts can define (top right of the program window) the start directory for searching on connected Android devices if necessary (the different manufacturers sometimes use different data directories in the different devices). You can also change or delete the IP address of the Android devices here if no WLAN connection is possible. Please only change these settings if you know what you are doing.
To apply your changes, click on the green "Apply" button. Afterwards, it is often necessary to restart the program.


